.png?width=225&height=400&name=MSR01%20AP%20Config%202%20(4).png "MSR01 AP Config 2 (4)")

1c. Mark the Installation Point
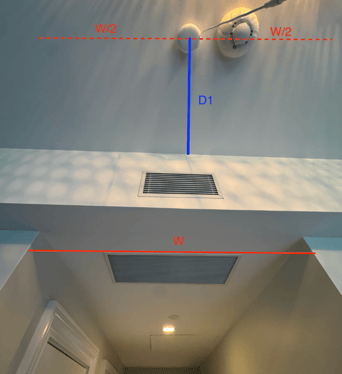
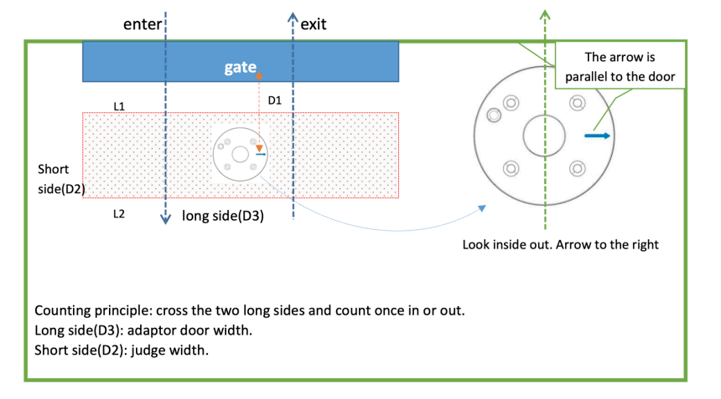
Using your D1 value and door width, mark a point on the ceiling D1 inches from the wall and centered above the door or gate. See the example below for reference.
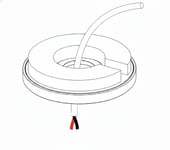
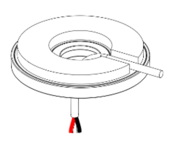
2a. Detach Mounting Base
Detach the circular Mounting Base from the Sensor as shown below.
2b. Attach Mounting Base to Ceiling
Attach one side of the double-sided adhesive to the back of the Mounting Base. Note: Make sure you are attaching the adhesive on the side opposite the arrow and magnet.
At this point you have two options:
-
Option 1: If you want to wire the DC Adaptor Cable through the ceiling, drill a hole at the marked installation point. Then, guide the DC Adaptor Cable through the central hole of the mounting base:
-
Option 2: If you want to thread the cable along the ceiling and wall, guide the DC Adaptor Cable through the central hole of the base and off through the side opening in the adhesive:
Align the Mounting Base with the Installation point you marked on the ceiling. If you decided to wire the cable through the ceiling, thread the DC Adaptor Cable through the hole.
- IMPORTANT: Before securing the Mounting Base to the ceiling, make sure the arrow is parallel to the door. When inside your store and looking at the door, the arrow should be pointing to the right, parallel to the door:
Tear off the other side of the adhesive and attach the Mounting Base to the ceiling. Press and hold for 10-15 seconds.
2c. Connect the Power Cable to the Sensor
On the Sensor: press down on the unlock, insert the correct wire, then release the unlock.
- IMPORTANT: Red goes in the positive hole, Black goes in the negative hole.

You can gently pull on the wires to confirm secure installation. If they cannot be pulled out, the installation is correct.
2d. Re-attach the Sensor to the Mounting Base
Snap the Sensor back to the Mounting Base magnetically.
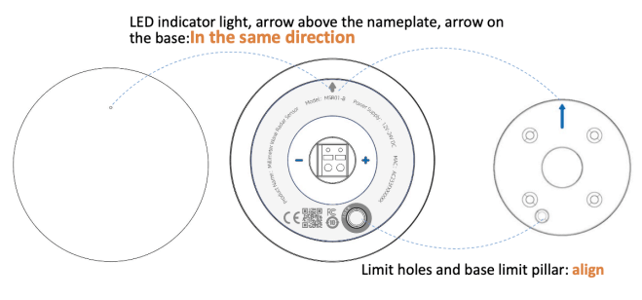
- IMPORTANT: Make sure the arrow on the Sensor aligns with the arrow on the Mounting Base, and the magnet snaps in properly to the lock. If correctly aligned, the LED light should be positioned on the right side of the product when you’re standing inside the store and facing the door/gate. The sensor can appear attached even when the magnet and arrow aren’t properly aligned.
2e. Test Power
Connect the DC Adaptor Cable to the DC Adaptor and plug in.
The LED Light should blink blue indicating your device has been turned on.
3a. Make sure your phone is connected to the same 2.4GHz WiFi Network you want the People Counter to use.
3b. Make sure the light on your People Counter is flashing blue, which indicates the power is connected.
3c. Make sure your phone is connected to the WiFi nNetwork you want to use.
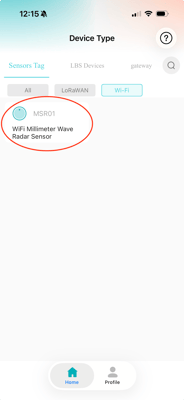
3e. Open MinewLink app. In Home > Sensors Tag > Wi-Fi: Select “WiFi Millimeter Wave Radar Sensor”

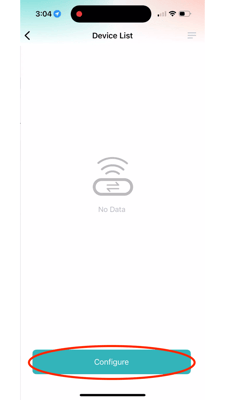
3f. Select “Configure”.
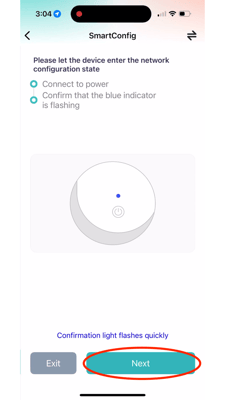
3g. Confirm the Blue Light on your People Counter is flashing, then select “Next”.
3h. Enter Wifi Network name and password. Set "Whether BSSID is specified" to "No" .
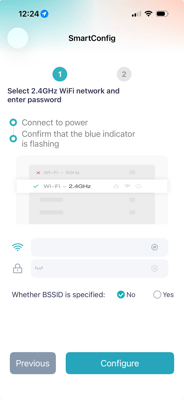
3i. Select Configure.
3j. Allow the app some time to locate and connect to your People Counter.
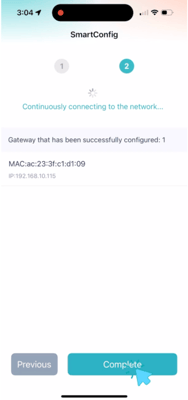
3k. Once your People Counter appears, select “Complete” then “Confirm”.
3l. The People Counter’s blue flashing light should turn solid blue. The solid blue light will then turn green for 60 seconds before turning off, which indicates a successful WiFi connection. Note: If the green light does not appear, or the light turns red, please see the “If WiFi Configuration Fails” section below.
Important Notes:
People Counters that have already been configured with a WiFi network will not enter smart configuration mode upon subsequent power-ups, but can still be configured using AP mode.
WiFi can be cleared through the app or via platform command. Once cleared, the People Counter will re-enter smart configuration mode, with the blue light flashing.

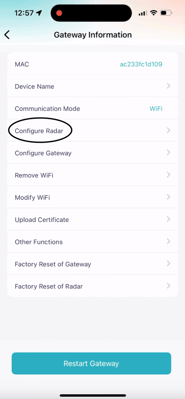
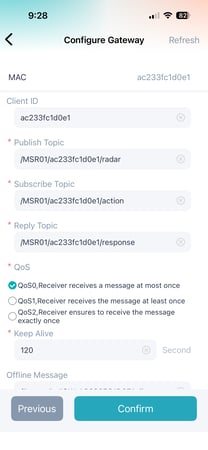
4a. Access the Radar Configuration Menu
In the MinewLink app, go to your Device List and select your People Counter. Then tap Configure Radar.
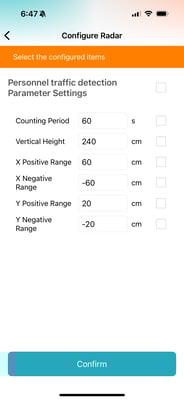
After selecting Configure Radar, you'll see a screen asking you to set six values:
1) Counting Period
2) Vertical Height
3) X Positive Range
4) X Negative Range
5) Y Positive Range
6) Y Negative range
The counting period refers to how often the People Counter sends data to ScreenHub (e.g., every 60 seconds). The vertical height refers to how far down from the ceiling the sensor should scan. The x/y positive and negative ranges define the rectangle that the People Counter monitors, as shown in the image at the beginning of Step 4.

4b. Calculate the Proper Configuration Settings
Using the ceiling height and door width you measured in Step 1, enter these values below to calculate the correct radar settings for your People Counter in the app.
4c. Input Your Configuration Settings
Please use the following settings:
-
Set the Counting Period to 60 seconds.
-
For the remaining settings (Vertical Height, X Positive Range, X Negative Range, Y Positive Range, Y Negative Range), enter the values you calculated in Step 4b.
4d. Confirm Settings and Configure the Radar
Check the box next to “Personnel Traffic Detection Parameter Settings” to select all six configuration settings:
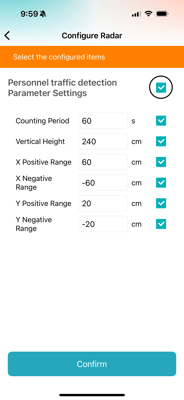
Tap Confirm.
After a few seconds, you should see the message “Configuration Succeeded”.
Next, set up your People Counter’s gateway settings so it can communicate with ScreenHub.
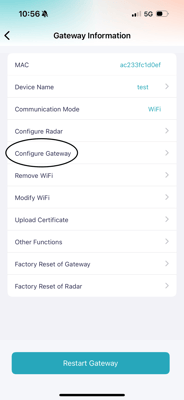
5a. Access the Gateway Configuration Menu
In the MinewLink app, go to your Device List and select your People Counter. Then tap Configure Gateway:
. 
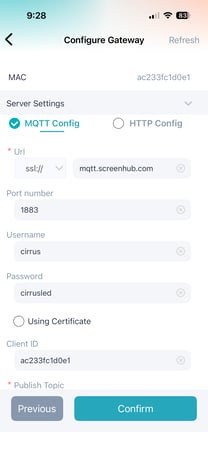
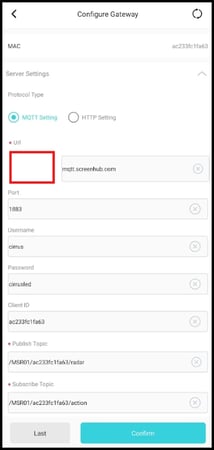
5b. Set Gateway Configuration Settings
Select MQTT Config.
Enter the following details:
- URL = ssl://mqtt.screenhub.com
- Port Number = 1883
- Username = cirrus
- Password = cirrusled
- Timezone = UTC-0 (very important!)
Confirm that all other settings match the images below (replace ac233fc1d0e1 with your People Counter's MAC address):

Note: if you're using an Android phone, the URL dropdown menu may be hidden. Please select the area outlined by the red box below, and then select ssl://
5c. Restart Gateway
After pressing "Confirm", you will be prompted to restart gateway. Please select the "Restart Gateway" button on the bottom of your screen, and then select Confirm:
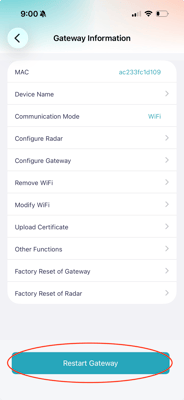
If gateway configuration was successful, the LED light on your People Counter should turn blue and then green, before shutting off.
Note: if the LED light on you People Counter turns red, it means it failed to connect to Cirrus' server. You should try again and make sure you enter all configuration settings correctly.
6a. Login to ScreenHub
Navigate to ScreenHub (https://v2.screenhub.com/sign-in) and login with your credentials.

If you have not created a ScreenHub account, please create one now. Note: Make sure you are using the same email you used when purchasing your Cirrus LED Sign.
6b. Navigate to People Counter Dashboard
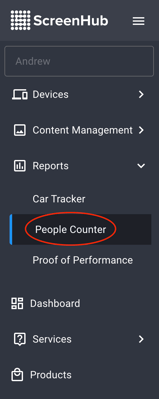
In the menu on the left-hand side of ScreenHub, select "Reports".
Then select "People Counter":
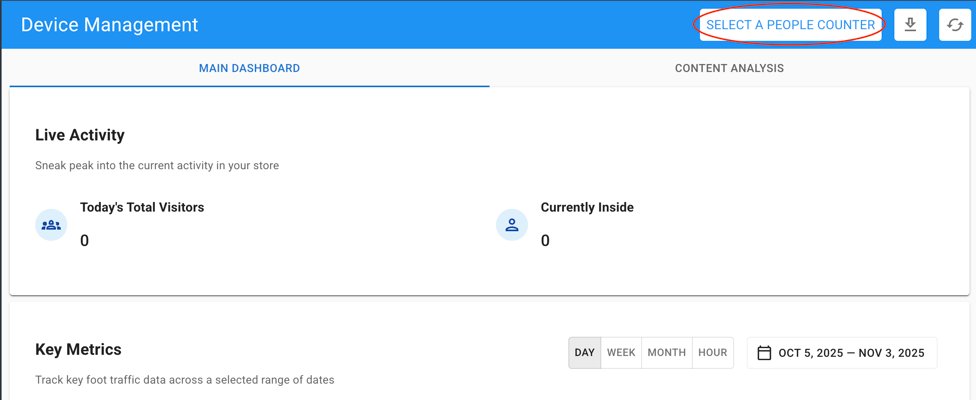
6b. Navigate to Add People Counter Menu
Select the "SELECT A PEOPLE COUNTER" button in the top right corner of the dashboard:
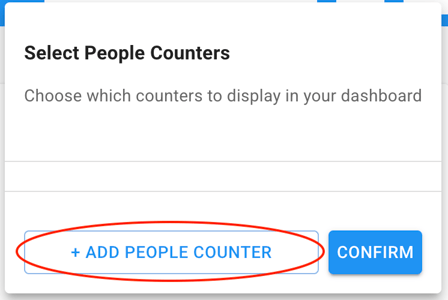
Select the "+ ADD PEOPLE COUNTER" button:
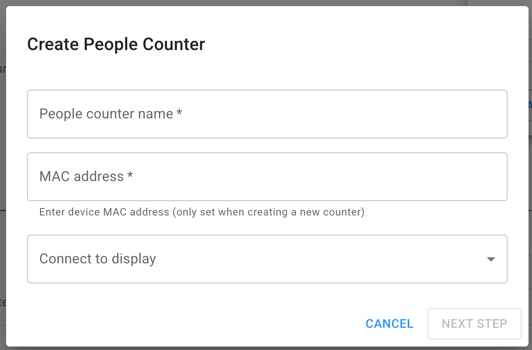
6c. Enter Your People Counter's Name and MAC Address
Enter a desired name for your People Counter.
Enter your People Counter's MAC address
For now, you can set the ‘Connect to display’ field to ‘None’. Once your display is installed, you will need to connect it to your People Counter.
Select "Next Step".
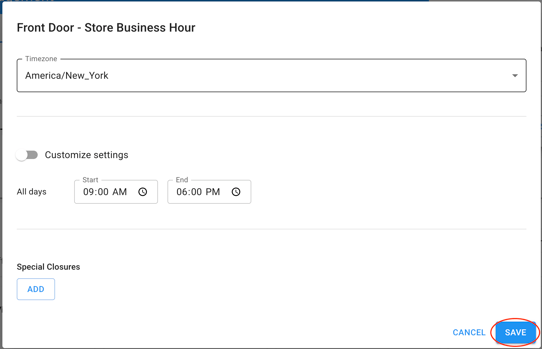
5d. Enter Business Hours
Enter your establishment's custom business hours. These hours will determine the time range your People Counter will collect data. You can set custom hours for each day of the week and select specific days when your business is closed. Note: Please make sure to select the correct time zone for your store.
Select "Save".